
ALE-140 Customization Kit (customization Kit)
![]() Please remove the
personalization kit before returning your desk phone or expansion module to
support, as they may return your phone in the default color.
Please remove the
personalization kit before returning your desk phone or expansion module to
support, as they may return your phone in the default color.
Description
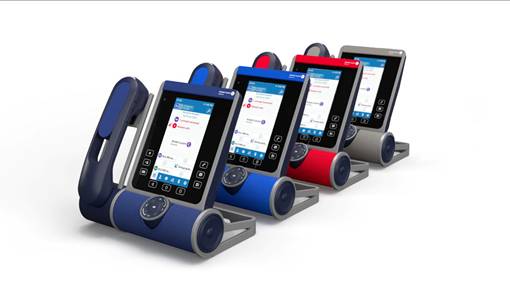
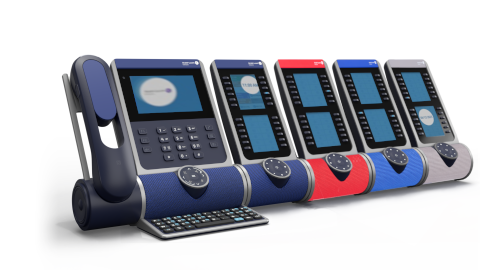
The ALE-140 Customization Kit lets you change the color of your desk phone. A default kit is installed on your desk phone and you can purchase the other kits separately.

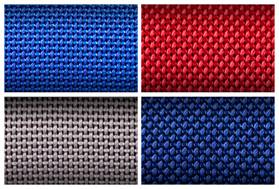
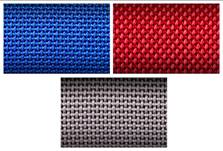
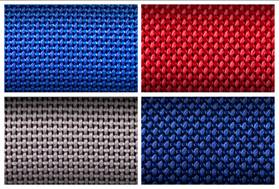
There are 4 colors:
|
· ALE-140 Azur Customization Kit (light blue). · ALE-140 Ruby Customization Kit (red). · ALE-140 Factory Customization Kit (gray). · ALE-140 Neptune Customization Kit (dark blue). |
|

A kit is composed of 3 pieces:

Unboxing
· ALE-140 Customization Kit.
· Installation procedure.
· Safety and regulatory instructions.
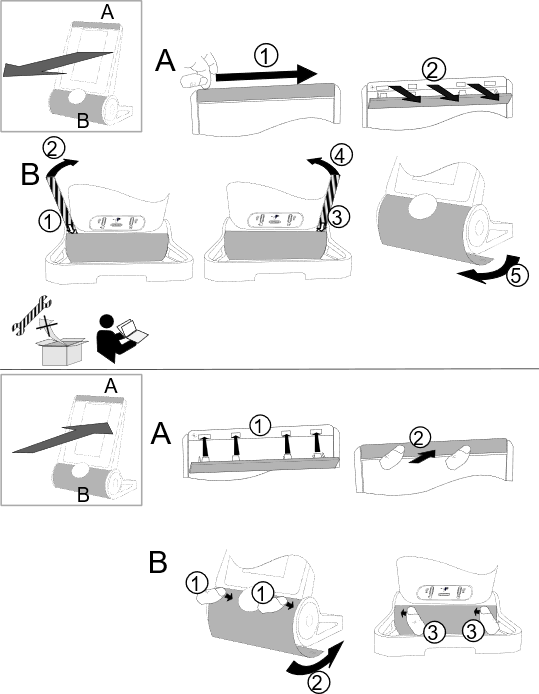
Remove or install the customization kit
 : No tools are provided with the kit. We just
recommend using a thin, non-sharp object to facilitate unclipping the piece
that covers the loudspeaker (B).
: No tools are provided with the kit. We just
recommend using a thin, non-sharp object to facilitate unclipping the piece
that covers the loudspeaker (B).

Remove the customization kit
|
|
A |
B |
C |
|
1 |
Slide your fingernail along the piece to detach it from the phone. |
This piece is clipped to the four corners. We recommend starting from the back of the desk phone. Carefully insert a thin, non-sharp object over the colored piece on left side. |
Press, then slide the piece towards the bottom of the device a few millimeters with your thumbs. |
|
2 |
Pull perpendicular to the desk phone along the entire length of the piece. Be careful not to break the clips. |
Gently lift the piece by pushing forward (you will hear a small click when the piece is removed). |
Remove the piece by lifting it. Be careful not to break the clips. |
|
3 |
|
Insert the thin, non-sharp object on the right side. |
|
|
4 |
|
Gently lift the piece by pushing forward (you will hear a small click when the piece is removed). |
|
|
5 |
|
Remove the piece by rotating it as shown in the drawing. |
|
Install the customization kit
|
|
A |
B |
C |
|
1 |
Place each clip facing the corresponding notches. Be careful to place the piece in the correct direction: the logo must be on the right hand side. |
Insert the piece around the speaker of the station. Press as shown in the drawing to clip the piece in the front (you should hear a small click when the clip is in its notch). |
Place the piece by respecting the notches. |
|
2 |
Press perpendicular to the desk phone all along the piece. Press gently so as not to force and break a clip. |
Push the piece by slight rotation until it is in its place. |
Slide the piece to the top of the handset a few millimeters with your thumbs. |
|
3 |
|
Press as shown in the drawing to clip the piece in the back (you should hear a small click when the clip is in its notch). |
|
ALE-140 Customization Kit (kit de personnalisation)
![]() Veuillez retirer le kit de personnalisation avant de renvoyer
votre téléphone de bureau ou votre module d'extension à l'assistance, car ils
pourraient vous renvoyer votre téléphone dans la couleur par défaut.
Veuillez retirer le kit de personnalisation avant de renvoyer
votre téléphone de bureau ou votre module d'extension à l'assistance, car ils
pourraient vous renvoyer votre téléphone dans la couleur par défaut.
Description
Le kit de personnalisation de l'ALE-140 vous permet de changer la couleur de votre téléphone de bureau. Un kit par défaut est installé sur votre téléphone, et vous pouvez acheter les autres kits séparément.

Il existe 4 couleurs :
|
· ALE-140 Azur Customization Kit (bleu clair). · ALE-140 Ruby Customization Kit (rouge). · ALE-140 Factory Customization Kit (gris). · ALE-140 Neptune Customization Kit (bleu foncé). |
|

Un kit se compose de 3 pièces :

Contenu de la boîte
· ALE-140 Customization Kit.
· Procédure d'installation.
· Consignes de sécurité et informations réglementaires.
Retirer ou installer le kit de personnalisation
 : Aucun outil n'est fourni avec le kit. Nous recommandons simplement
d'utiliser un objet fin et non tranchant pour faciliter le déclipsage de la
pièce qui recouvre le haut-parleur (B).
: Aucun outil n'est fourni avec le kit. Nous recommandons simplement
d'utiliser un objet fin et non tranchant pour faciliter le déclipsage de la
pièce qui recouvre le haut-parleur (B).

Retirer le kit de personnalisation
|
|
A |
B |
C |
|
1 |
Faire glisser votre ongle le long de la pièce pour la détacher du téléphone. |
Cette pièce est fixée aux quatre coins. Nous recommandons de commencer par l'arrière du téléphone de bureau. Insérer soigneusement un objet fin et non tranchant sur la pièce colorée du côté gauche. |
Appuyer, puis faire glisser la pièce vers le bas de l'appareil de quelques millimètres avec vos pouces. |
|
2 |
Tirer perpendiculairement au téléphone de bureau sur toute la longueur de la pièce. Attention à ne pas casser les clips. |
Soulever doucement la pièce en la poussant vers l'avant (vous entendrez un petit clic lors du retrait de la pièce). |
Retirer la pièce en la soulevant. Attention à ne pas casser les clips. |
|
3 |
|
Insérer l'objet fin et non tranchant sur le côté droit. |
|
|
4 |
|
Soulever doucement la pièce en la poussant vers l'avant (vous entendrez un petit clic lors du retrait de la pièce). |
|
|
5 |
|
Retirer la pièce en la faisant tourner comme indiqué sur le dessin. |
|
Installer le kit de personnalisation
|
|
A |
B |
C |
|
1 |
Placer chaque clip face aux encoches correspondantes. Veiller à placer la pièce dans le bon sens : le logo doit se trouver sur le côté droit. |
Insérer la pièce autour du haut-parleur du poste. Appuyer comme indiqué sur le dessin pour fixer la pièce à l'avant (vous devriez entendre un petit clic lorsque le clip est dans son encoche). |
Placer la pièce en respectant les encoches. |
|
2 |
Appuyer perpendiculairement au téléphone de bureau tout le long de la pièce. Appuyer doucement pour ne pas forcer et casser un clip. |
Pousser la pièce par une légère rotation jusqu'à ce qu'elle soit en place. |
Faire glisser la pièce de quelques millimètres vers le haut du combiné avec vos pouces. |
|
3 |
|
Appuyer comme indiqué sur le dessin pour fixer la pièce à l'arrière (vous devriez entendre un petit clic lorsque le clip est dans son encoche). |
|
ALE-140 Customization Kit (Anpassungskit)
![]() Bitte entfernen Sie das
Personalisierungskit, bevor Sie Ihr Tischtelefon oder Erweiterungsmodul an den
Kundendienst zurückschicken, da Sie Ihr Telefon möglicherweise in der
Standardfarbe zurückschicken.
Bitte entfernen Sie das
Personalisierungskit, bevor Sie Ihr Tischtelefon oder Erweiterungsmodul an den
Kundendienst zurückschicken, da Sie Ihr Telefon möglicherweise in der
Standardfarbe zurückschicken.
Beschreibung
Mit dem ALE-140 Anpassungskit können Sie die Farbe Ihres Tischtelefons ändern. Ein Standard-Kit ist auf Ihrem Telefon installiert und Sie können die anderen Kits separat erwerben.

Es gibt 4 Farben:
|
· ALE-140 Azur Customization Kit (hellblau). · ALE-140 Ruby Customization Kit (rot). · ALE-140 Factory Customization Kit (Grau). · ALE-140 Neptune Customization Kit (dunkelblau). |
|
Ein Kit besteht aus 3 Teilen:

Auspacken
· ALE-140 Customization Kit.
· Installationsverfahren.
· Sicherheitshinweise und behördliche Vorgaben.
Anpassungskit entfernen oder installieren
 : Dem Kit sind keine Werkzeuge beigefügt. Wir
empfehlen lediglich die Verwendung eines dünnen, nicht scharfen Gegenstandes,
um das Lösen des Elements, das den Lautsprecher abdeckt, zu erleichtern (B).
: Dem Kit sind keine Werkzeuge beigefügt. Wir
empfehlen lediglich die Verwendung eines dünnen, nicht scharfen Gegenstandes,
um das Lösen des Elements, das den Lautsprecher abdeckt, zu erleichtern (B).

Anpassungskit entfernen
|
|
A |
B |
C |
|
1 |
Lösen Sie das Element mit dem Fingernagel vom Telefon. |
Dieses Element ist an den vier Ecken mit Halterungen befestigt. Wir empfehlen, auf der Rückseite des Telefons zu beginnen. Führen Sie vorsichtig einen dünnen, nicht scharfen Gegenstand über das farbige Element auf der linken Seite. |
Drücken und schieben Sie die Abdeckung mit den Daumen einige Millimeter nach unten. |
|
2 |
Ziehen Sie das Element über die gesamte Länge senkrecht zum Tischtelefon. Achten Sie darauf, dass die Halterungen nicht brechen. |
Heben Sie das Element vorsichtig an, indem Sie es nach vorne drücken (Sie werden ein leises Klicken hören, wenn das Element entfernt ist). |
Entfernen Sie die Abdeckung durch Anheben. Achten Sie darauf, dass die Halterungen nicht brechen. |
|
3 |
|
Führen Sie den dünnen, nicht scharfen Gegenstand auf der rechten Seite ein. |
|
|
4 |
|
Heben Sie das Element vorsichtig an, indem Sie es nach vorne drücken (Sie werden ein leises Klicken hören, wenn das Element entfernt ist). |
|
|
5 |
|
Entfernen Sie das Element, indem Sie es wie in der Zeichnung gezeigt drehen. |
|
Anpassungskit installieren
|
|
A |
B |
C |
|
1 |
Platzieren Sie jede Halterung an den entsprechenden Kerben. Achten Sie darauf, dass das Element in der richtigen Richtung angebracht wird: Das Logo muss auf der rechten Seite sein. |
Setzen Sie das Element um den Lautsprecher der Station herum ein. Drücken Sie wie in der Zeichnung gezeigt, um das Element vorne einzurasten (Sie sollten ein kleines Klicken hören, wenn der Clip in seiner Kerbe sitzt). |
Platzieren Sie die Abdeckung unter Beachtung der Einkerbungen. |
|
2 |
Drücken Sie entlang des gesamten Elements senkrecht zum Tischtelefon. Drücken Sie vorsichtig, um keine Halterung zu brechen. |
Schieben Sie das Element durch leichte Drehung an seinen Platz. |
Schieben Sie die Abdeckung mit den Daumen einige Millimeter nach oben. |
|
3 |
|
Drücken Sie wie in der Zeichnung gezeigt, um das Element hinten einzurasten (Sie sollten ein kleines Klicken hören, wenn der Clip in seiner Kerbe sitzt). |
|
ALE-140 Customization Kit (kit de personalización)
![]() Retire el kit de personalización antes de devolver el
teléfono de escritorio o el módulo de expansión al servicio de asistencia, ya
que puede que devuelvan el teléfono con el color predeterminado.
Retire el kit de personalización antes de devolver el
teléfono de escritorio o el módulo de expansión al servicio de asistencia, ya
que puede que devuelvan el teléfono con el color predeterminado.
Descripción
Con el kit de personalización ALE-140 puede cambiar el color de su teléfono de oficina. Su teléfono tiene instalado un kit predeterminado los demás kits se pueden adquirir por separado.
Hay 4 colores:
|
· ALE-140 Azur Customization Kit (azul claro). · ALE-140 Ruby Customization Kit (rojo). · ALE-140 Factory Customization Kit (gris). · ALE-140 Neptune Customization Kit (azul oscuro). |
|

Un kit se compone de 3 piezas:

Unboxing
· ALE-140 Customization Kit.
· Procedimiento de instalación.
· Instrucciones sobre seguridad y normativas.
Quitar o instalar el kit de personalización
 : El kit no incluye ninguna herramienta. Solo recomendamos utilizar un objeto fino y no
punzante para facilitar el desenganche de la pieza que cubre el altavoz (B).
: El kit no incluye ninguna herramienta. Solo recomendamos utilizar un objeto fino y no
punzante para facilitar el desenganche de la pieza que cubre el altavoz (B).

Quitar el kit de personalización
|
|
A |
B |
C |
|
1 |
Deslice la uña por la pieza para separarla del teléfono. |
Esta pieza está enganchada en las cuatro esquinas. Le recomendamos que empiece por la parte trasera del teléfono de oficina. Inserte con cuidado un objeto fino y no punzante sobre la pieza de color del lado izquierdo. |
Pulse, luego deslice la pieza hacia la parte inferior del dispositivo unos milímetros con los pulgares. |
|
2 |
Tire por toda la longitud de la pieza en perpendicular al teléfono de oficina. Tenga cuidado de no romper los clips. |
Levante suavemente la pieza empujándola hacia delante (oirá un pequeño clic cuando la pieza se desmonte). |
Retire la pieza levantándola. Tenga cuidado de no romper los clips. |
|
3 |
|
Inserte el objeto fino y no punzante en el lado derecho. |
|
|
4 |
|
Levante suavemente la pieza empujándola hacia delante (oirá un pequeño clic cuando la pieza se desmonte). |
|
|
5 |
|
Retire la pieza girándola como se muestra en el dibujo. |
|
Instalar el kit de personalización
|
|
A |
B |
C |
|
1 |
Coloque cada clip frente a las muescas correspondientes. Asegúrese de colocar la pieza en la dirección correcta: el logotipo debe estar en el lado derecho. |
Inserte la pieza alrededor del altavoz de la estación. Presione como se muestra en el dibujo para enganchar la pieza en la parte delantera (debería oír un pequeño clic cuando el clip entra en su muesca). |
Coloque la pieza respetando las muescas. |
|
2 |
Presione a lo largo de toda la pieza en perpendicular al teléfono de oficina. Presione suavemente para no forzar y romper un clip. |
Empuje la pieza con una ligera rotación hasta que esté en su sitio. |
Deslice la pieza hacia la parte superior del teléfono unos milímetros con los pulgares. |
|
3 |
|
Presione como se muestra en el dibujo para enganchar la pieza en la parte posterior (debería oír un pequeño clic cuando el clip entra en su muesca). |
|
ALE-140 Customization Kit (kit di personalizzazione)
![]() Rimuovere il kit di
personalizzazione prima di restituire il telefono fisso o il modulo di
espansione al supporto, in quanto quest'ultimo potrebbe restituire il telefono
nel colore predefinito.
Rimuovere il kit di
personalizzazione prima di restituire il telefono fisso o il modulo di
espansione al supporto, in quanto quest'ultimo potrebbe restituire il telefono
nel colore predefinito.
Descrizione
Il kit di personalizzazione ALE-140 consente di cambiare il colore del telefono fisso. Un kit di default è installato sul telefono ed è possibile acquistare gli altri kit separatamente.

Ci sono 4 colori:
|
· ALE-140 Azur Customization Kit (blu chiaro). · ALE-140 Ruby Customization Kit (rosso). · ALE-140 Factory Customization Kit (grigio). · ALE-140 Neptune Customization Kit (blu scuro). |
|

Un kit si compone di 3 pezzi:

Disimballaggio
· ALE-140 Customization Kit.
· Procedura di installazione.
· Istruzioni sulla sicurezza e sulle normative.
Rimuovere o installare il kit di personalizzazione
 : Nessuno strumento è fornito con il kit. Si consiglia solo di utilizzare un oggetto sottile e
non tagliente per facilitare la rimozione del pezzo che copre l'altoparlante
(B).
: Nessuno strumento è fornito con il kit. Si consiglia solo di utilizzare un oggetto sottile e
non tagliente per facilitare la rimozione del pezzo che copre l'altoparlante
(B).
Rimuovere il kit di personalizzazione
|
|
A |
B |
C |
|
1 |
Far scorrere l'unghia lungo il pezzo per staccarlo dal telefono. |
Questo pezzo è tagliato ai quattro angoli. Si consiglia di iniziare dal retro del telefono fisso. Inserire con attenzione un oggetto sottile e non tagliente sopra il pezzo colorato sul lato sinistro. |
Premere, quindi far scorrere il pezzo verso la parte inferiore deldispositivo di alcuni millimetri con i pollici. |
|
2 |
Tirare perpendicolarmente al telefono fisso per tutta la lunghezza del pezzo. Prestare attenzione a non rompere le clip. |
Sollevare delicatamente il pezzo spingendo in avanti (si sentirà un leggero clic quando il pezzo viene rimosso). |
Rimuovere il pezzo sollevandolo. Prestare attenzione a non rompere le clip. |
|
3 |
|
Inserire l'oggetto sottile e non tagliente sul lato destro. |
|
|
4 |
|
Sollevare delicatamente il pezzo spingendo in avanti (si sentirà un leggero clic quando il pezzo viene rimosso). |
|
|
5 |
|
Rimuovere il pezzo ruotandolo come mostrato nel disegno. |
|
Installare il kit di personalizzazione
|
|
A |
B |
C |
|
1 |
Posizionare ogni clip di fronte alle tacche corrispondenti. Fare attenzione a posizionare il pezzo nella direzione corretta: il logo si deve trovare sul lato destro. |
Inserire il pezzo intorno all'altoparlante della stazione. Premere come mostrato nel disegno per agganciare il pezzo nella parte anteriore (si dovrebbe sentire un leggero clic quando la clip è nella sua tacca). |
Posizionare il pezzo rispettando le tacche. |
|
2 |
Premere perpendicolarmente al telefono fisso lungo tutto il pezzo. Premere delicatamente per non forzare e rompere una clip. |
Spingere il pezzo con una leggera rotazione fino a quando non è in posizione. |
Far scorrere il pezzo nella parte superiore del ricevitore di qualche millimetro con i pollici. |
|
3 |
|
Premere come mostrato nel disegno per agganciare il pezzo nella parte posteriore (si dovrebbe sentire un leggero clic quando la clip è nella sua tacca). |
|
ALE-140 Customization Kit (kit de personalização)
![]() Retire o kit de personalização
antes de devolver o telefone de secretária ou o módulo de expansão ao serviço
de assistência, uma vez que o telefone poderá ser-lhe devolvido na cor
predefinida.
Retire o kit de personalização
antes de devolver o telefone de secretária ou o módulo de expansão ao serviço
de assistência, uma vez que o telefone poderá ser-lhe devolvido na cor
predefinida.
Descrição
O kit de personalização do ALE-140 permite-lhe mudar a cor do seu telefone de secretária. É instalado um kit predefinido no seu telefone e pode adquirir os outros kits em separado.

Há 4 cores:
|
· ALE-140 Azur Customization Kit (azul claro). · ALE-140 Ruby Customization Kit (vermelho). · ALE-140 Factory Customization Kit (cinzento). · ALE-140 Neptune Customization Kit (azul escuro). |
|

Um kit é constituído por 3 peças:

Conversão unboxing
· ALE-140 Customization Kit.
· Procedimento de instalação.
· Instruções de segurança e regulamentares.
Remover ou instalar o kit de personalização
 : Não são fornecidasferramentas com o kit. Apenas recomendamos
autilização de um objeto fino e não afiado para facilitaro destravamento da
peça que cobre o altifalante (B).
: Não são fornecidasferramentas com o kit. Apenas recomendamos
autilização de um objeto fino e não afiado para facilitaro destravamento da
peça que cobre o altifalante (B).

Remover o kit de personalização
|
|
A |
B |
C |
|
1 |
Deslize a unha ao longo da peça para a separar do telefone. |
Esta peça tem clipes nos quatro cantos. Recomendamos que comece pela parte de trás do telefone de secretária. Insira com cuidado um objeto fino e não afiado sobre a peça colorida do lado esquerdo. |
Prima, depois deslize a peça para o fundo dodispositivo alguns milímetros com os polegares. |
|
2 |
Puxar perpendicularmente ao telefone de secretária ao longo de todo o comprimento da peça. Cuidado para não quebrar os clipes. |
Levante delicadamente a peça empurrando-a para a frente (ouvirá um pequeno clique quando a peça for removida). |
Retire a peça, levantando-a. Cuidado para não quebrar os clipes. |
|
3 |
|
Insira o objeto fino e não afiado no lado direito. |
|
|
4 |
|
Levante delicadamente a peça empurrando-a para a frente (ouvirá um pequeno clique quando a peça for removida). |
|
|
5 |
|
Remova a peça rodando-a como se mostra no desenho. |
|
Instalar o kit de personalização
|
|
A |
B |
C |
|
1 |
Coloque cada um dos clipes virado para os entalhes correspondentes. Cuidado ao colocar a peça na direção correta: o logótipo deve estar do lado direito. |
Insira a peça à volta do altifalante da estação. Prima como mostrado no desenho para prender a peça na frente (deverá ouvir um pequeno clique quando o clipe estiver no respetivo entalhe). |
Coloque a peça respeitando os entalhes. |
|
2 |
Pressione perpendicularmente ao telefone de secretária ao longo de toda a peça. Pressione suavemente de modo a não forçar e partir um clipe. |
Empurre a peça com uma ligeira rotação até que esta fique no respetivo lugar. |
Deslize a peça alguns milímetros para o topo do telefone com os polegares. |
|
3 |
|
Pressione como mostrado no desenho para prender a peça na parte de trás (deverá ouvir um pequeno clique quando o clipe estiver no respetivo entalhe). |
|
ALE-140 Customization Kit (özelleştirme kiti)
![]() Lütfen masaüstü telefonunuzu
veya genişletme modülünüzü destek birimine göndermeden önce kişiselleştirme
kitini çıkarın, aksi takdirde telefonunuzu varsayılan renge döndürebilirler.
Lütfen masaüstü telefonunuzu
veya genişletme modülünüzü destek birimine göndermeden önce kişiselleştirme
kitini çıkarın, aksi takdirde telefonunuzu varsayılan renge döndürebilirler.
Açıklama
ALE-140 özelleştirme kiti, masa telefonunuzun rengini değiştirmenize olanak tanır. Telefonunuzda varsayılan bir kit yüklüdür, diğer kitleri ayrı olarak satın alabilirsiniz.

4 renk vardır:
|
· ALE-140 Azur Customization Kit (açık mavi). · ALE-140 Ruby Customization Kit (kırmızı). · ALE-140 Factory Customization Kit (gri). · ALE-140 Neptune Customization Kit (koyu mavi). |
|

Bir kit 3 parçadan oluşur:

Kutudan çıkarma
· ALE-140 Customization Kit.
· Kurulum prosedürü.
· Güvenlik ve yönetmelik talimatlarý.
Özelleştirme kitini kaldırın veya kurun
 : Kit ile birlikte herhangi bir alet gönderilmez. Sadece
hoparlörü kaplayan parçayı yerinden çıkarmayı kolaylaştırmak için ince, keskin
olmayan bir nesne kullanmanızı öneriyoruz (B).
: Kit ile birlikte herhangi bir alet gönderilmez. Sadece
hoparlörü kaplayan parçayı yerinden çıkarmayı kolaylaştırmak için ince, keskin
olmayan bir nesne kullanmanızı öneriyoruz (B).

Özelleştirme kitini kaldırın
|
|
A |
B |
C |
|
1 |
Tırnağınızı parça boyunca kaydırarak parçayı telefondan ayırın. |
Bu parça dört köşeye tutturulmuş. Masa telefonunun arkasından başlamanızı öneriyoruz. Sol taraftaki renkli parçanın üzerine dikkatlice ince, keskin olmayan bir nesne sokun. |
Parçayı bastırın ve ardından başparmaklarınızla cihazın altına doğru birkaç milimetre kaydırın. |
|
2 |
Parçayı tüm uzunluğu boyunca masa telefonuna dik olarak çekin. Klipsleri kırmamaya dikkat edin. |
Parçayı ileri doğru iterek yavaşça kaldırın (parça çıktığında hafif bir tık sesi duyulur). |
Parçayı kaldırarak çıkarın. Klipsleri kırmamaya dikkat edin. |
|
3 |
|
Ince, keskin olmayan nesneyi sağ tarafa sokun. |
|
|
4 |
|
Parçayı ileri doğru iterek yavaşça kaldırın (parça çıktığında hafif bir tık sesi duyulur). |
|
|
5 |
|
Parçayı çizimde gösterildiği gibi döndürerek çıkarın. |
|
Özelleştirme kitini kurun
|
|
A |
B |
C |
|
1 |
Her klipsi kendisine denk gelen çentiklere bakacak şekilde yerleştirin. Parçayı doğru yönde yerleştirmeye özen gösterin: logo sağ tarafta olmalıdır. |
Parçayı istasyonun hoparlörünün etrafına yerleştirin. Parçayı öne tutturmak için çizimde gösterildiği gibi bastırın (klips çentiğindeyken hafif bir tık sesi duyulur). |
Çentiklere dikkat ederek parçayı yerleştirin. |
|
2 |
Parçayı tüm uzunluğu boyunca masa telefonuna dik olarak bastırın. Klipsleri zorlayıp kırmamak için hafifçe bastırın. |
Parçayı yerine oturana kadar hafifçe döndürerek itin. |
Parçayı başparmaklarınızla ahizenin üstüne birkaç milimetre kaydırın. |
|
3 |
|
Parçayı arkaya tutturmak için çizimde gösterildiği gibi bastırın (klips çentiğindeyken hafif bir tık sesi duymalısınız). |
|
ALE-140 Customization Kit (定制套件)
![]() 请在将您的桌面话机或扩展模块退回支持部门之前移除个性化套件,因为他们可能会以默认颜色退回您的电话。
请在将您的桌面话机或扩展模块退回支持部门之前移除个性化套件,因为他们可能会以默认颜色退回您的电话。
描述
ALE-140 定制套件允许您更改桌面话机的颜色。 您的话机上安装了默认套件,您可以单独购买其他套件。
有 4 种颜色:
|
· ALE-140 Azur Customization Kit (浅蓝色)。 · ALE-140 Ruby Customization Kit (红色)。 · ALE-140 Factory Customization Kit (灰色)。 · ALE-140 Neptune Customization Kit (深蓝色)。 |
|
套件由 3 个部件组成:

拆箱
· ALE-140 Customization Kit。
· 安装过程。
· 安全与规则说明。
移除或安装定制套件
 : 套件中未提供任何工具。 我们只建议使用薄而不锋利的物体来方便松开覆盖扬声器的部件 (B)。
移除定制套件
|
|
A |
B |
C |
|
1 |
沿着部件滑动指甲将其与话机分开。 |
此部件被夹在四个角上。 我们建议从桌面话机的背面开始。 小心地在左侧的彩色部件上插入一个薄的、不锋利的物体。 |
按下,然后用拇指将电池向设备底部滑动几毫米。 |
|
2 |
沿着部件的整个长度垂直于桌面话机拉动。 注意不要弄坏电池夹。 |
向前推动,轻轻地提起部件(拆下部件时您会听见一声轻微的咔嚓声)。 |
提起电池将其取下。 注意不要弄坏电池夹。 |
|
3 |
|
在右侧插入薄而不锋利的物体。 |
|
|
4 |
|
向前推动,轻轻地提起部件(拆下部件时您会听见一声轻微的咔嚓声)。 |
|
|
5 |
|
如图所示,通过旋转拆下部件。 |
|
安装定制套件
|
|
A |
B |
C |
|
1 |
将每个夹子朝向相应的凹口。 注意将部件朝正确的方向放置:徽标必须位于右侧。 |
将部件插入站点的扬声器周围。 按图所示按压,将部件夹在正面(当夹子进入凹口时,您应该能听见一声轻微的咔嚓声)。 |
按凹口放置电池。 |
|
2 |
沿着整个部件垂直于桌面话机按压。 轻轻按压,以免用力弄坏夹子。 |
稍微旋转推动部件,直到它到位。 |
用大拇指将电池向手持机上方滑动几毫米。 |
|
3 |
|
按图所示按压,将部件夹在背面(当夹子进入凹口时,您应该能听见一声轻微的咔嚓声)。 |
|